VPC Peering
Hello everyone,
Today, we'll be exploring VPC peering in AWS. In Amazon Web Services (AWS), a Virtual Private Cloud (VPC) is a logically isolated network segment you create within the cloud. You can launch resources like EC2 instances into your VPC.
VPC peering is a networking connection established between two VPCs that enables you to route traffic between them using private IP addresses.
Why do we need VPC peering?
VPC peering is essential for enabling private communication between VPCs without relying on public IPs or the internet. It facilitates secure and efficient sharing of resources across different VPCs, whether they reside within the same account, different accounts, or even different regions.
Alright, time to put our knowledge to work!
Overview
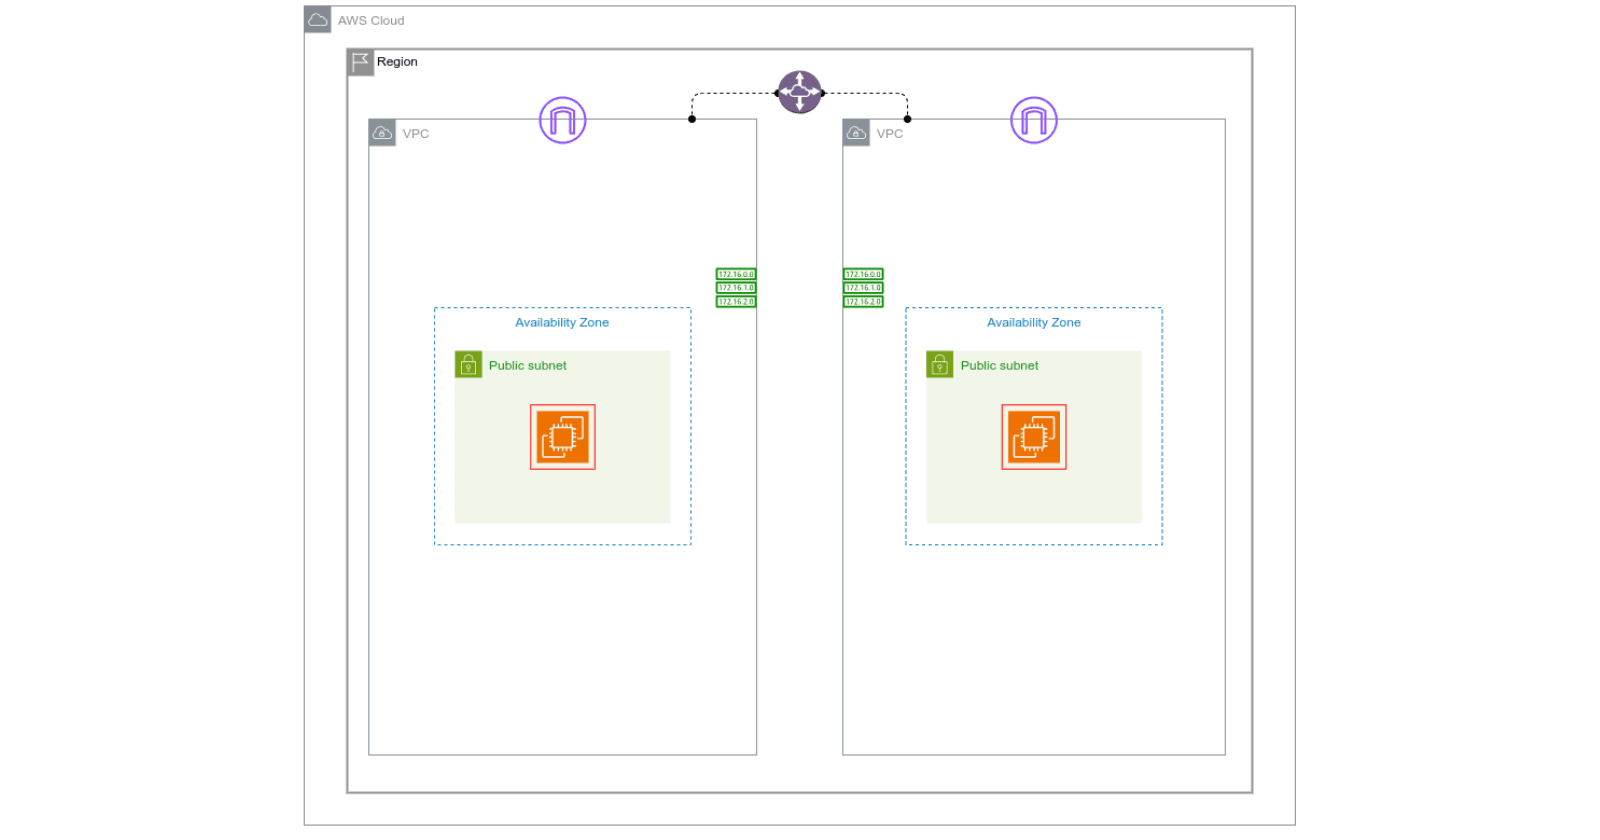
We will set up two VPCs, each containing instances. We will SSH into our instances and initiate communication with instances in the other VPC to test if our VPC peering connection is working.
Task 1: Creating VPCs
Search for VPC in the search box.

On VPC dashboard, click on Create VPC.

Provide a name for your VPC and input a CIDR range value for your VPC.
Click on Create VPC.

Let's create another VPC.

Provide a suitable name and input a CIDR range value for your second VPC.
Click on Create VPC.

We have created two VPCs.

Task 2: Creating Internet gateway
On Internet gateways, click on Create internet gateway.


Provide a name for your Internet gateway and click on Create internet gateway.

After creating internet gateway, attach to your first VPC.

Similarly, create another internet gateway and attach to the second VPC.

Task 3: Creating Subnets
On Subnets, click on Create subnet.

Select your first VPC.

Provide a suitable name for your VPC, choose AZ and input a valid CIDR range for your subnet.
Click on Create subnet.

Let's create another subnet in our second VPC.

Provide the name for your subnet, select AZ, and input an eligible CIDR range.
Click on Create subnet.

We have created two subnets in different VPCs.

Task 4: Creating Route tables
On Route tables, click on Create route table.


Provide the name for your route table and select your first VPC.
Click on Create route table.

On Subnet associations, click on Edit subnet associations.

Select your subnet and click on Save associations.

On Routes, click on Edit routes.

Click on Add route to add the above configurations.
Click on Save changes.
Now, let's create another route table, associate the corresponding subnet to it & add the necessary route.


And now we have set up our second route table.

We have created two route tables for two VPCs.

Task 5: Creating EC2 instances
Go to EC2 dashboard, on Instances, click on Launch instances.

Provide name for your EC2, select an AMI. Create or use an existing key pair.

Edit Network settings. Select your first VPC, subnet and Enable the Auto-assign public IP.
We are provided with default SSH configuration.

Click on Add security group rule.

Configure the above configurations in your Security group rule.
On Advanced Details, scroll to User data and paste the following command.
#!/bin/bash

# Update and install apache2
apt-get update
apt-get install -y apache2

# Create a simple index.html file with "Hello" text
echo "Hello FIRST" > /var/www/html/index.html

# Restart apache2 service
systemctl restart apache2
Leave all other configurations as default and click on Launch instance.
Now, let's create another instance.
Provide name for your instance, choose an AMI, either create or use an existing key pair.

Edit Network settings, select your second VPC, subnet and Enable the Auto-assign public IP.
Repeat the necessary instructions (security group rule) as earlier.
Here is the user data for the second instance.
#!/bin/bash

# Update and install apache2
apt-get update
apt-get install -y apache2

# Create a simple index.html file with "Hello" text
echo "Hello SECOND" > /var/www/html/index.html

# Restart apache2 service
systemctl restart apache2
Leaving all other configurations as default, click on Launch instance.
We have created two EC2 instances in different subnets residing in different VPCs.


Task 6: Establishing a VPC Peering Connection
A peering connection is a networking connection between two Virtual Private Clouds that allows them to communicate as if they are on the same network.
Go to VPC dashboard, scroll down to Peering connections, click on Create peering connection.


Provide a suitable name and select your first VPC as Requester.
One VPC initiates a peering connection request to another VPC.

We can establish a peering connection to a VPC in our own account as well as to a VPC in another account.
The owner of the target VPC accepts the peering request.
Click on Create peering connection.

Since both VPCs reside within the same account, this acceptance request message appears. In the Actions panel, click Accept request to proceed.
Now, both VPCs must update their route tables to direct traffic destined for the other VPC through the peering connection.

On Route tables, click on one of your Route table.

Click on Edit routes.

Click on Add route.
Duplicate your current tab and copy the IPv4 CIDR of your second VPC.
Note that for the first router, IPv4 CIDR of second VPC must be configured while for second router, IPv4 CIDR of the first VPC is considered.


Paste into the Destination field and select your Peering connection in Target field.
Click on Save changes.
Now, let's set up the necessary route for the second VPC.

Copy the IPv4 CIDR of your first VPC and paste it into the destination field in your second route table.


Click on Save changes.
Now, we have set up the necessary peering routes in the respective route tables.

Task 7: SSH into EC2s
On Instances, select one of your instance and click on Connect.


On SSH client, we are going to follow some instructions.

Copy the command and paste it into your terminal.


Copy the command and paste it into your terminal.
Proceed with yes.

We are into our first instance now.
Now, it's time to SSH into our second instance.
Follow all the instructions as before.

We are now connected to the second instance via SSH.


Copy the private IPv4 address of the second instance.

Type the command curl and paste the copied private IPv4 address of the second instance.
The curl command is being used to retrieve content from a web server at IP address 12.0.1.98.
We can see the second instance is responding to our request.
Let's see it the other way around.

We can see the connection is happening between two instances.
Now, let's remove the connection and see if the connection still happens.
Task 8: Removing Peering Connection
On VPC dashboard, on Route tables, click on your first route table.


Click on Edit routes.

Remove the peering route.
Click on Save changes.
Now, repeat the same process for your second route table.
Okay, now that we have updated our route tables, let's try to make the same request from both of our instances.

There is no response to the request at this time.
Let's try from another instance.

Following the removal of the VPC peering connection, the VPCs can no longer communicate directly as if they were on the same network.
Conclusion
In this session, we explored the concept of VPC peering by establishing connections between two VPCs. We successfully initiated communication between instances in these peered VPCs.
Task 9: Clean Up
Terminating Instances.

Select both of your instances and in the Instance state panel, click on
Terminate instance.Deleting Subnets.

Go to VPC dashboard, on Subnets, select both of your subnets and in the Actions panel, click on
Delete subnet.Deleting Route table.

On Route tables, select both of your route tables and in the Actions panel, click on
Delete route table.Deleting peering connection.

Select your created peering connection and in the Actions panel, click on
Delete peering connection.Deleting VPCs.

Select one of your VPC and in the Actions panel, click on
Delete VPC. Repeat the same to delete the other VPC.
Now, we have cleaned up our used resources.
Alright people, see you in the next one!