Auto Scaling Groups
Today we will learn about Auto Scaling Group.
Auto Scaling Groups (ASGs), as the name suggests, automatically adjust the number of EC2 instances in response to demand. They help ensure your application is both responsive and cost-effective by scaling up during high traffic and scaling down during low traffic.
Let's get started.
Overview
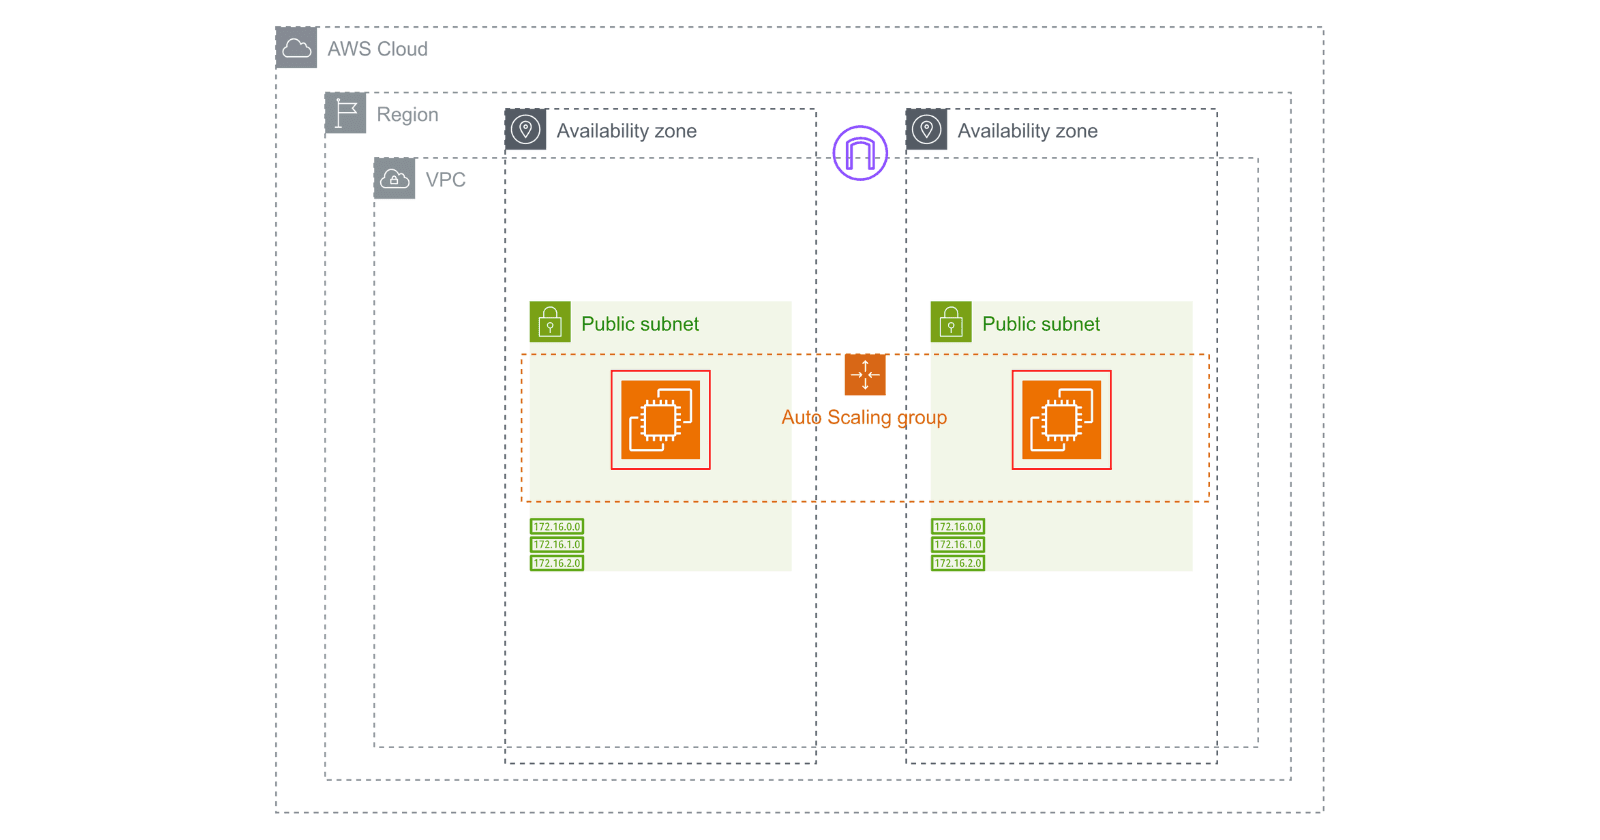
In this setup, we will create an Auto Scaling Group (ASG) to manage the provisioning and scaling of EC2 instances based on changing demand. The ASG will automatically adjust the number of instances in response to load fluctuations, ensuring optimal performance and cost-efficiency.
Task 1: Creating a VPC
Search for VPC in the search box.

Click on Create VPC.

Provide a name for your VPC and input a CIDR range.
Keeping all other configurations default, click on Create VPC.


Task 2: Creating Internet Gateway
On Internet gateways, click on Create internet gateway.


Provide a name for your Internet Gateway and click on Create internet gateway.

Attach the Internet Gateway to your VPC.

Now, we have attached an internet gateway to our VPC.

Task 3: Creating Subnets
On Subnets, click on Create subnet.


Select your VPC.

Click on Add new subnet to create another subnet.

Click on Create subnet.
We have created two subnets in different AZs.

Task 4: Creating Route table
On Route tables, click on Create route table.


Provide name for your route table, select your VPC and click on Create route table.

On Subnet associations, click on Edit subnet associations.

Tick both of your subnets and click on Save associations.

On Routes, click on Edit routes.

Click on Add route and configure above configurations.
Click on Save changes.

Task 5: Creating Launch template
Previously, launching EC2 instances involved manually configuring every detail for each launch. Launch templates simplify this process by offering a reusable definition - essentially a blueprint - that stores settings such as AMI, instance type, security groups, and more. This streamlines instance creation, enables straightforward configuration versioning, and maintains consistency across your deployments.
On EC2 dashboard, on Launch Templates, click on Create launch template.

Provide a suitable name for your template.

On Quick Start, choose Ubuntu as an AMI.

Choose instance type and either create or select your existing key pair.

In the Network settings, subnets are not selected. Instead, a Security Group is created for the instances. Select your VPC and add the inbound rules to your Security Group.

In the Advanced network configuration, click on Add network interface and Enable the Auto-assign public IP option.
With all other configurations left as default, click on Create launch template.
Task 6: Creating Auto Scaling Group
On EC2 dashboard, scroll to bottom on Auto Scaling Groups.
Click on Create Auto Scaling group.


Name your Auto Scaling Group and select the Launch template you created.
Click on Next.

Select your VPC and choose your subnets.
Click on Next.

For this project, we are not going to associate a load balancer.

The Health Check Grace Period gives new instances time to start up and become healthy before health checks start. This prevents instances from being incorrectly marked as unhealthy and terminated during startup. Setting a grace period allows instances to boot up, configure themselves, and start applications, leading to more stable scaling.
Determines how long to wait before starting health checks on a new instance.
With all other configurations set to default, click on Next.

In normal operations, the Auto Scaling group keeps 2 instances running (Desired capacity). It can scale up to 3 instances in high traffic (Max desired capacity) but never goes below 1 instance in low traffic (Min desired capacity).

Scaling policies determine how the group responds to changes in demand. These policies are based on metrics like CPU utilization, network traffic, or custom CloudWatch alarms.

By setting up these policies, we can ensure our application always has enough resources to handle traffic spikes, while also optimizing costs during quieter periods.

The Target Tracking Scaling Policy in AWS Auto Scaling automatically adjusts the number of instances in a group to maintain a specific metric at a target value.
Instance warm-up refers to time before a new instance is included in scaling activities. It ensures the instance is fully operational before being counted.
Determines how long to wait before including a new instance in scaling decisions.
Our scaling policy adjusts the number of instances to maintain a 50% average CPU utilization. During high traffic, it adds instances to handle the load and maintains performance. During low traffic, it reduces instances to the minimum required, prioritizing cost optimization over meeting the 50% target.
Click on Next, keeping all other configurations default until you reach the option to Create Auto Scaling group.


Task 7: Exploring Auto Scaling groups
Let's perform various actions on our Auto Scaling Groups.

Select your Auto Scaling group and click on the Activity section.

Our Auto Scaling Group is currently launching instances.

The instances for our desired capacity have been launched.

We can see the instances in the Instances console.
Now, let's terminate one of the EC2 instances.

Let's head up to the Auto Scaling Group's Activity section to see what happens next.

We can see our terminating instance while the Auto Scaling Group (ASG) is launching a new instance to reach our desired capacity.

In the meantime, an Auto Scaling Group terminated one EC2 instance. As there is currently no traffic, the ASG is operating efficiently by keeping only the minimum required resources running.

Now, click on the ID of your running instance, then navigate to the Monitoring section.
Enlarge the CPU utilization metric.


Let's increase the CPU utilization.

On your instance details, click on Connect.

On EC2 Instance Connect, click on Connect.

We're now connected to our instance.
Copy the command and paste into your terminal.
sudo apt-get update # updating package lists
sudo apt-get install stress -y # installing stress
- stress utility is used to simulate high CPU usage scenarios for testing and benchmarking purposes.
And now it's time to spike the CPU utilization.
# Stress the CPU cores for 5 minutes
stress --cpu $(nproc) --timeout 300
This command stresses all available CPU cores for 5 minutes using the stress tool. $(nproc) dynamically determines the number of CPU cores.
Let's check the CPU utilization metric of our instance.

We can observe that the CPU utilization is increasing.
Now, let's check the Auto Scaling Group's Activity section to see if there are any changes.

We can see that the Auto Scaling Group (ASG) has launched an instance in response to the increasing load.
As the CPU utilization continues to rise, as we have configured it to spike for 5 minutes, another instance is being launched by the Auto Scaling Group (ASG), and now we've reached our maximum EC2 limit as set by us.


Let's go to the Instances list.

We can see that 2 additional instances have been launched by ASG as the CPU utilization metric crossed the threshold that we had set.
And when the CPU utilization is low, a scale-in event will occur.
That's the beauty of Auto Scaling.
Conclusion
We created an Auto Scaling Group with a minimum capacity of one instance, a desired capacity of two instances, and a maximum capacity of three instances. We observed both scale-in and scale-out events during the testing process. To stimulate CPU utilization, we used a stress utility tool.
Tasks 8: Clean Up
Deleting Auto Scaling Group

Select your Auto Scaling Group, and in the Actions panel, click on
Delete.Deleting Launch Template

Select your Launch Template and in Actions panel, click on
Delete template.Deleting Subnet

Go to the VPC Dashboard. In the Subnets section, select both of your subnets, and in the Actions panel, click on
Delete subnet.Deleting Route Table

Select your route table, and in the Actions panel, click on
Delete route table. If you're unable to do so, try refreshing the box.Deleting Internet Gateway & VPC

Select your VPC and in the Actions panel, click on
Delete VPC.Deleting the VPC will also delete the internet gateway associated with it.
We have now cleaned up our used resources.
Alright! See you next time!